|
|||||||
| Community Links |
| Pictures & Albums |
| Members List |
| Search Forums |
| Tag Search |
| Advanced Search |
| Go to Page... |
 |
|
|
Thread Tools |
|
|
#1 |
|
Oh, it's beautiful.
Join Date: Jun 2012
Location: Under Tarkin's skin.
Posts: 884
|
Well as we all know The Avengers figures have no wrist joints. There are a few other joints they don't have but I think the wrist is the most important since you can get better poses with them holding their weapons.
So is there a way to make wrist joints? Like somehow cut off the hands and stick them back on with a peg? A way to fix broken wrist joints on figures that have them could likely be used here. I already looked around and all the joint related stuff is for the 6 in. Thanks!! 
__________________
photobucketsucks.jpg please vistit my BST http://www.toyark.com/trekking95s-b-s-t-107986 |
|
|

|
|
|
#2 |
|
Join Date: Jul 2009
Posts: 284
|
Yes just find a set of hands w/ pegs (in your fodder bin, or find a custom parts site w/ them on it), cut the hands off of your figure at the wrist, drill a hole in the lower arm for the new wrist peg, and plug the hands into the wrist.
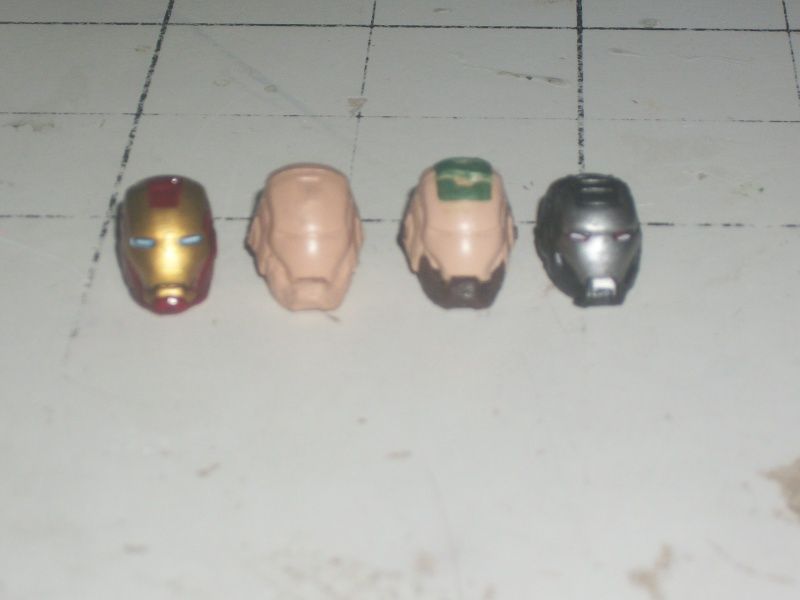
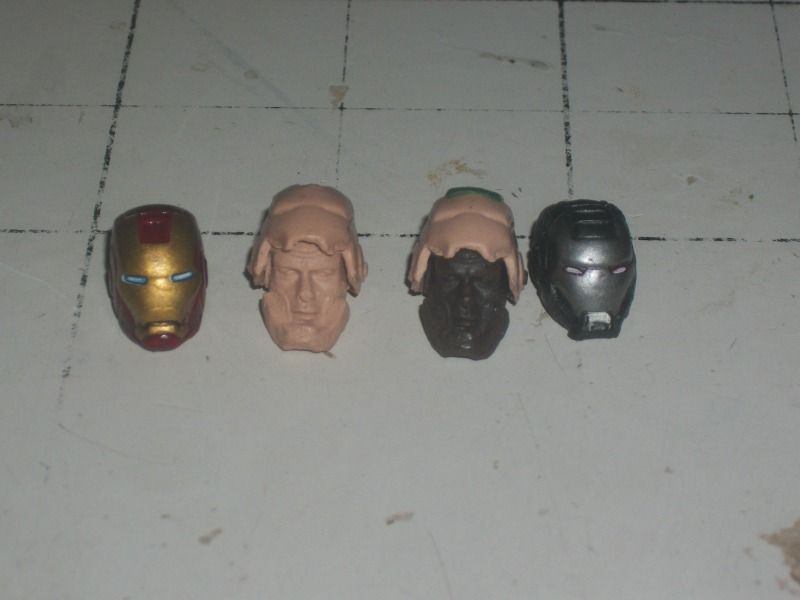
My MKVII IM w/ wrists (hands are from a MKIII, and MKIV), better legs from the MKIV, and the opening face plate head, and WM w/ opening face plate head. (opening face plate heads are from my store) 
|
|
|

|
|
|
#3 |
|
G33k & G@m3r Grrl
Join Date: Jul 2011
Location: Gallifrey
Posts: 3,581
|
You can cut the hand off at the wrist and use A piece of a paper clip or small pin, stick one end in the hand and the other into the lower arm
__________________
Listen up threes, a ten is speaking |
|
|

|
|
|
#4 |
|
Join Date: Dec 2008
Posts: 199
|
I have used toothpicks or slim styrene rods. Mostly because its cheap and i can cut it long and the shorten it as needed to keep it deep in the socket and still flush to the forearm.
Cut the hand flush as possible, then dremel out a cavity for the peg to fit into (smallest drill bit you have - even smaller than the peg, as that will keep the hand tight with friction). good luck with this, it can be a little tricky. |
|
|

|
|
|
#5 |
|
Oh, it's beautiful.
Join Date: Jun 2012
Location: Under Tarkin's skin.
Posts: 884
|
Quote:
Yes just find a set of hands w/ pegs (in your fodder bin, or find a custom parts site w/ them on it), cut the hands off of your figure at the wrist, drill a hole in the lower arm for the new wrist peg, and plug the hands into the wrist.
My MKVII IM w/ wrists (hands are from a MKIII, and MKIV), better legs from the MKIV, and the opening face plate head, and WM w/ opening face plate head. (opening face plate heads are from my store)  The heads look good, where is your store?
__________________
photobucketsucks.jpg please vistit my BST http://www.toyark.com/trekking95s-b-s-t-107986 |
|
|

|
|
|
#6 |
|
Join Date: Jul 2009
Posts: 284
|
Quote:
As for my store there's a link in my signature. |
|
|

|
|
|
#7 |
|
Oh, it's beautiful.
Join Date: Jun 2012
Location: Under Tarkin's skin.
Posts: 884
|
Never mind, just used a large computer screen to look instead of the iPod. Still grainy at the larger size but I can tell they are the right color.
And from the looks of it the difference in the heads from those 2 packs is the one is a bit more bulky for the weapons platform guy compared to the silver armor one. Am I right?
__________________
photobucketsucks.jpg please vistit my BST http://www.toyark.com/trekking95s-b-s-t-107986 Last edited by trekking95; 06-14-2012 at 02:02 AM.. |
|
|

|
|
|
#8 |
|
Join Date: Jul 2009
Posts: 284
|
Quote:
Never mind, just used a large computer screen to look instead of the iPod. Still grainy at the larger size but I can tell they are the right color.
And from the looks of it the difference in the heads from those 2 packs is the one is a bit more bulky for the weapons platform guy compared to the silver armor one. Am I right?  
|
|
|

|
|
|
#9 |
|
Oh, it's beautiful.
Join Date: Jun 2012
Location: Under Tarkin's skin.
Posts: 884
|
Also what paint color is best for the red and gold for the one and silver and dark grey for the other?
__________________
photobucketsucks.jpg please vistit my BST http://www.toyark.com/trekking95s-b-s-t-107986 |
|
|

|
|
|
#10 |
|
Join Date: Jul 2009
Posts: 284
|
I used the Apple Barrel paints from Walmart. For the red I used a coat of silver, and then 2 thin coats of gloss red, and the gold is just regular gold paint. Though next time I'm going to use gold paint over gold sharpie.
For Warmachine I used flat black over silver to make it look like the gun metal paint Hasbro used. The silver on the face plate is silver paint over silver sharpie |
|
|

|
|
|
#11 |
|
Oh, it's beautiful.
Join Date: Jun 2012
Location: Under Tarkin's skin.
Posts: 884
|
Quote:
I used the Apple Barrel paints from Walmart. For the red I used a coat of silver, and then 2 thin coats of gloss red, and the gold is just regular gold paint. Though next time I'm going to use gold paint over gold sharpie.
For Warmachine I used flat black over silver to make it look like the gun metal paint Hasbro used. The silver on the face plate is silver paint over silver sharpie
__________________
photobucketsucks.jpg please vistit my BST http://www.toyark.com/trekking95s-b-s-t-107986 |
|
|

|
|
|
#12 |
|
Join Date: Jul 2009
Posts: 284
|
The metallic gold, and silver sharpies are for deep coloring. They kind of dye the plastic, but they are slightly sticky. So a coat of acrylic paint over that gets rid of the stickiness, and the marker underneath means single coats of the metallic paints which often tend to really show brush marks when multiple coats are applied.
|
|
|

|
|
|
#13 |
|
Oh, it's beautiful.
Join Date: Jun 2012
Location: Under Tarkin's skin.
Posts: 884
|
Quote:
The metallic gold, and silver sharpies are for deep coloring. They kind of dye the plastic, but they are slightly sticky. So a coat of acrylic paint over that gets rid of the stickiness, and the marker underneath means single coats of the metallic paints which often tend to really show brush marks when multiple coats are applied.
Also how did you get the limbs out of the figures? Did the bodies need split open or can you heat and pop?
__________________
photobucketsucks.jpg please vistit my BST http://www.toyark.com/trekking95s-b-s-t-107986 |
|
|

|
|
|
#14 |
|
Oh, it's beautiful.
Join Date: Jun 2012
Location: Under Tarkin's skin.
Posts: 884
|
Just got all the limbs switched except the left leg. The peg for the left leg of the body of the Avengers Iron Man is bigger than the right one. So the right leg from Mark VI pops right on where the left doesn't. How did you fix that?
Also when I was taking the one leg of the Mark VI the peg inside the torso broke right off up inside it. Is there a way to fix that? The stub on the leg ball joint is so small that if you put a screw in it the tip might go into the joint. Not that it really matters since it is not a complete figure anymore.
__________________
photobucketsucks.jpg please vistit my BST http://www.toyark.com/trekking95s-b-s-t-107986 |
|
|

|
|
|
#15 |
|
Join Date: Oct 2008
Location: Pittsburgh
Posts: 220
|
For the broken piece in the leg, you can try to use a wood screw into it (if it's a big piece), then heat with a hair dryer and pull it out. If its a smaller piece you could just use a ball bur to drill it into dust, but realize you don't want to make the cavity too big, so be careful not to go nuts over it.
As for your initial question about wrists, I seem to remember a Joe website from ages ago, pre-modern body type, that went into adding wrist swivel with finishing nails. That way the nail head works to stop the wrist coming back out. If I can find it I'll post a link. |
|
|

|
|
|
#16 |
|
Oh, it's beautiful.
Join Date: Jun 2012
Location: Under Tarkin's skin.
Posts: 884
|
Quote:
For the broken piece in the leg, you can try to use a wood screw into it (if it's a big piece), then heat with a hair dryer and pull it out. If its a smaller piece you could just use a ball bur to drill it into dust, but realize you don't want to make the cavity too big, so be careful not to go nuts over it.
As for your initial question about wrists, I seem to remember a Joe website from ages ago, pre-modern body type, that went into adding wrist swivel with finishing nails. That way the nail head works to stop the wrist coming back out. If I can find it I'll post a link. Finishing nails, sounds like it could work. The website is still around then?
__________________
photobucketsucks.jpg please vistit my BST http://www.toyark.com/trekking95s-b-s-t-107986 |
|
|

|
 |
«
Previous Thread
|
Next Thread
»
 Similar Threads
|
||||
| Thread | Thread Starter | Forum | Replies | Last Post |
| stuck joints on mu figs | frodotrout | Toy and Action Figure General Discussion | 7 | 07-16-2011 08:05 PM |
| Paint rubs off of joints. | Tiberius | Customs General Discussion | 3 | 07-16-2011 07:11 PM |
| A discussion about leg joints | Tarquinius | Marvel Toys Discussion | 20 | 06-07-2011 05:08 PM |
| Where did my clone joints go?? | T16skyhopp | Toy and Action Figure General Discussion | 0 | 05-11-2011 07:21 AM |
|
|


| Latest Marvel Discussion |
| New Marvel 3.75" Appreciation Thread |
| New Marvel Legends/6" Appreciation Thread |
| Latest Customs and Fan Art |
| Judge Dredd |
| DC Batman Beyond - 6" ML Style |
| Batman |
All times are GMT -7. The time now is 05:44 AM.
Powered by vBadvanced CMPS.
Powered by vBulletin. Copyright ©2000 - 2026, Jelsoft Enterprises Ltd.


